
The Countertop Sprouting Protocol: How Germination Unlocks 10x Bioactive Nutrients
A laboratory-tested kitchen methodology to deactivate anti-nutritional phytic acid, multiply bioavailable antioxidants by up to 5000%, and harvest fresh living food year-round.
Inside every dormant seed lies an evolutionary defense mechanism: a biochemical shield designed to survive digestion, extreme temperatures, and months in dry soil until optimal conditions trigger life.
These protective mechanisms—primarily phytic acid (myo-inositol hexakisphosphate), enzyme inhibitors, and lectins—bind tightly to essential minerals like iron, zinc, magnesium, and calcium in the human digestive tract, rendering up to 60% of their micronutrients chemically unabsorbable.
However, the moment a dry seed absorbs ambient water, an extraordinary biochemical cascade occurs. The seed deactivates its dormancy enzymes, mobilizes endosperm starch into simple sugars, and synthesizes profound concentrations of secondary metabolites and protective polyphenols.
By applying a precise Countertop Sprouting Protocol, you can deactivate up to 90% of anti-nutritional phytates and amplify antioxidant concentrations—including sulforaphane in brassicas—by up to 50 times (5,000%) compared to the mature vegetable.
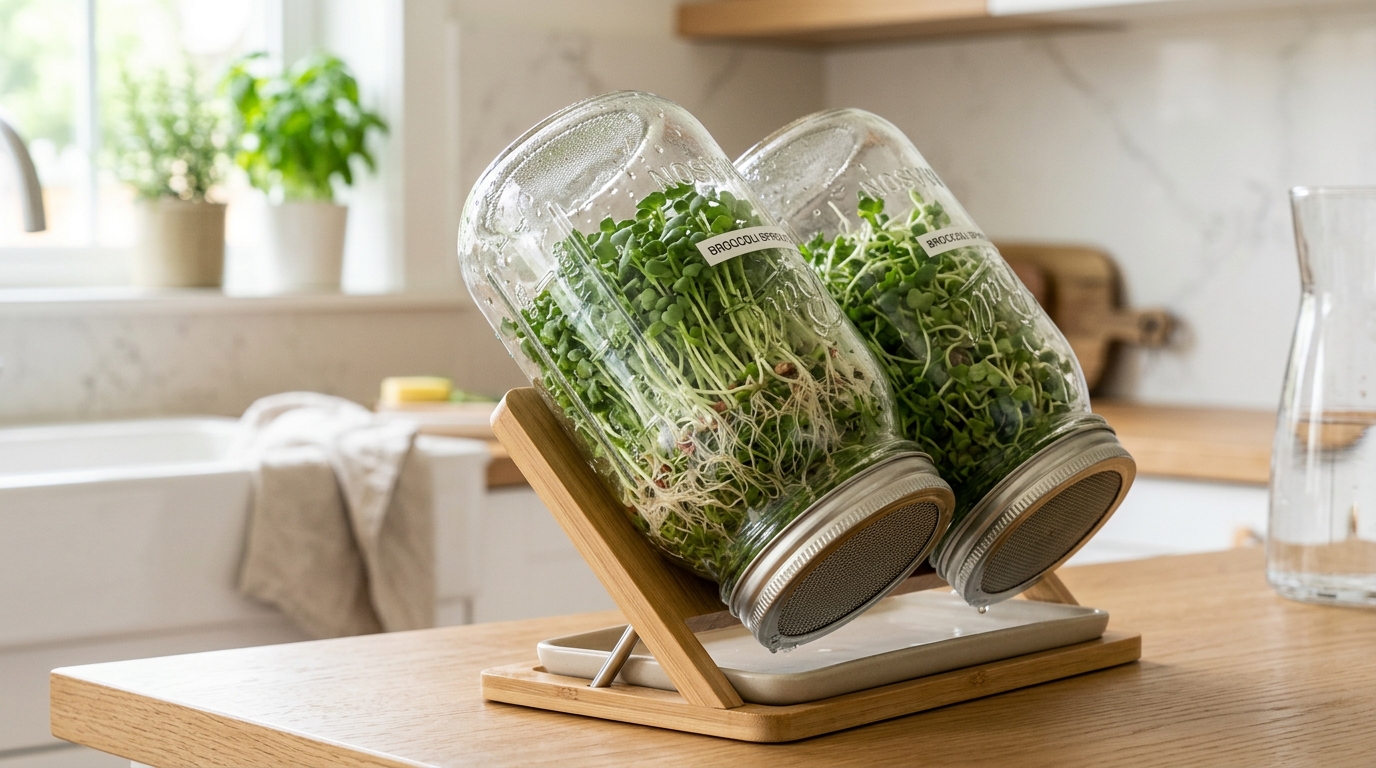
Sprouting seeds on your countertop: Sprouting dormant seeds in water for 3 to 5 days deactivates up to 90% of anti-nutritional phytic acid and activates endogenous enzymes, multiplying bioavailable zinc, iron, and cellular antioxidants by up to 5,000%. Certified organic, pathogen-tested sprouting seeds require only a 32-oz wide-mouth mason jar with a 316 stainless-steel mesh lid inverted at a 45-degree angle with twice-daily rinsing.
1. The Biochemistry of Seed Awakening
When water penetrates the seed coat (a process called imbibition), endogenous phytase enzymes are activated. Phytase cleaves the phosphate groups from the phytic acid ring, liberating previously bound chelated divalent minerals:
Phytic Acid + Endogenous Phytase → Free Bioavailable Fe²⁺, Zn²⁺, Mg²⁺ + Inositol
Simultaneously, dormant storage proteins undergo enzymatic proteolysis into free amino acids and low-molecular-weight peptides, radically increasing the Digestible Indispensable Amino Acid Score (DIAAS) of the food without requiring cooking or heat denaturing.
Dormant Seed (High Phytate, Bound Minerals, Stored Starch)
                    │
           + Water Imbibition (8-12 hrs)
                    ▼
Activated Phytase Enzyme Cascade
                    │
    ┌───────────────┴───────────────┐
    ▼                               ▼
Mineral Liberation          Phytochemical Boom
(Zinc +280%, Iron +140%)    (Sulforaphane 20x–50x vs Broccoli)
2. Essential Equipment: The Sterile Micro-Farming Setup
You do not need expensive commercial climate chambers to produce commercial-grade organic sprouts. You only need three sterile components:
- Wide-Mouth 32-oz Glass Mason Jar: Transparent glass allows photosynthetically active radiation (PAR) to hit the young cotyledons on days 4 and 5.
- Food-Grade 316 Stainless Steel Mesh Lid: Essential for preventing rust and allowing rapid water expulsion during rinsing. Plastic mesh lids often harbor fungal biofilm in microscopic cracks.
- 45-Degree Inverted Drainage Stand: The critical failure point in home sprouting is standing water. The jar must sit inverted at a 45° angle with a ceramic catchment dish underneath to permit continuous passive air exchange while gravity drains excess moisture.
🌱 Editor's Recommended Sprouting Seeds & Kitchen Equipment
Pathogen Lab Tested- 100% Certified USDA Organic Brassica oleracea var. italica
- Tested clean for Salmonella, E. coli O157:H7, and microbial pathogens
- Verified high germination rate exceeding 98% within 72 hours
- Produces potent glucoraphanin yields for maximum sulforaphane
- Surgical-grade 316 stainless steel mesh drainage screens
- Engineered 45-degree inverted stands with ceramic drip catchment tray
- Maximizes passive airflow while eliminating standing mold water
- Fits all standard 32-oz wide-mouth glass Mason jars
3. The 5-Day Day-by-Day Sprouting Protocol
| Phase / Day | Action Protocol | Environmental Conditions | Target Botanical Milestone |
|---|---|---|---|
| Day 1: Imbibition | Soak 2 tablespoons of certified organic seed in 2 cups filtered water for 8–12 hours. | Room temperature (68°F–72°F), indirect light. | Water uptake causes seed swelling; seed coat ruptures. |
| Day 2: Germination | Drain soak water thoroughly. Rinse with cool filtered water. Invert jar at 45°. | Dark cabinet or shaded counter. | Emergence of primary radicle root tip (0.5mm to 1mm). |
| Day 3: Rapid Elongation | Rinse and drain 2 times daily (Morning and Evening: 8 AM / 8 PM). | Maintain ambient temperature below 74°F. | Secondary root hair development (often mistaken for mold). |
| Day 4: Photosynthesis | Rinse and drain 2 times daily. Move jar onto open countertop with natural indirect sunlight. | Indirect sunlight (NE or NW window exposure). | Chlorophyll synthesis; cotyledon leaves turn deep vibrant green. |
| Day 5: Harvest & Spin | Final rinse. Submerge sprouts in cold water bath to float off loose seed hulls. Spin dry thoroughly. | Cold water immersion → Salad spinner. | Tender 1.5–2 inch living sprouts ready for consumption. |
4. Troubleshooting: Mold vs. Root Hairs & Food Safety
The most common beginner error in sprouting is discarding healthy young sprouts because of root hairs.
- Root Hairs (Healthy): Delicate, micro-fine, single-cell white filaments that emerge along the taproot on Days 2 and 3. They are uniform, disappear completely when wet during rinsing, and smell fresh and earthy like clean soil.
- Fungal Mold (Contamination): Web-like, grayish or blue-green fuzz that clings together even when submerged in water. It is accompanied by a pungent, sour, or fermenting odor and a slimy film along the glass walls.
The Food Safety Clean-Kill Rule
To ensure 100% safety against pathogenic bacteria (Salmonella or E. coli), always source pathogen-tested, certified organic sprouting seeds. Before starting the Day 1 soak, perform a quick 5-minute pre-rinse using a mild food-grade hydrogen peroxide (3%) or diluted organic apple cider vinegar bath (1 tbsp per cup of water), followed by a thorough flush with pure filtered water.
Synergistic Botanical Integration
To explore the cellular anti-inflammatory chemistry of sulforaphane, consult our companion clinical guide on broccoli sprouts vs mature broccoli: the 50x sulforaphane potency guide. You can also track your sprouts as one of your weekly botanical points in the 30-Plants Microbiome Diversity Tracker, and calculate complete mineral absorption with our Daily Seed Nutrition & Protein Stacker.
5. Storage and Daily Nutritional Utilization
Once harvested, moisture is the enemy of sprout longevity. After spinning your sprouts completely dry in a manual salad spinner, line an airtight glass container with unbleached organic paper towels and store the sprouts in the coldest section of your refrigerator (34°F–38°F).
Sprouts will remain crisp, living, and enzymatically active for 7 to 10 days. Add half a cup daily to salads, grain bowls, sandwiches, or blend raw into smoothies for an instant, bioavailable surge of cellular antioxidant enzymes.